Recover all data from your iOS devices, iTunes and iCloud backup.
2 Easy Ways to Lock/Unlock Notes on iPhone 16/15/14
Notes app on iPhone is one of the handy ways to store detailed data regarding private information, financials, personal accounts, etc. However, others can easily access it, which might cause data leakage. Because of this case, you may want your Notes to be secured. Well, this post will show you different workable yet reliable ways how to lock notes on iPhone 16/15/14. Can’t wait to explore them all? Take your first step now!
How to Lock/Unlock Notes on iPhone 16/15/14
Method 1. Setting Up a Strong Password to Lock Notes on iPhone:
Setting up a password is one of the best ways to make your notes invulnerable to any threats, especially if they contain personal or confidential information. However, setting up passwords for Notes differ from iPhone 15, 14, 13, 12, and 11 versions. From the group of steps below, choose the one that applies to you based on what version of the iPhone you are currently using.
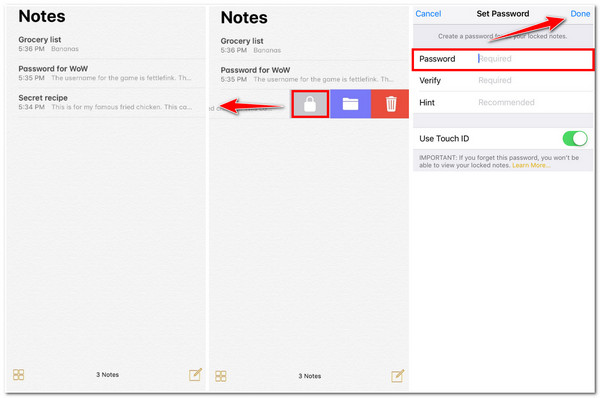
◆ For those users of iPhone 11/12, there’s a new feature released by Apple for your Notes app. This feature lets you lock specific Notes by swiping them to the left. How do you do it? Here are the steps on how to lock notes on iPhone 11/12:
Step 1Access your Notes app on your iPhone and choose which note you want to secure. Then, swipe the note to the left and tap the Padlock icon from the options.
Step 2After that, on the Set Password screen, enter your desired password in the Password’s input field and continue the process with Verify and Hint. You can also enable your Touch ID for secured notes.
Step 3Once you are satisfied with your password setups, tap the Done button at the upper right corner of your screen.

◆ Otherwise, if you are currently using an new iPhone, here are a few simple steps on how to lock notes on iPhone 15/14/13.
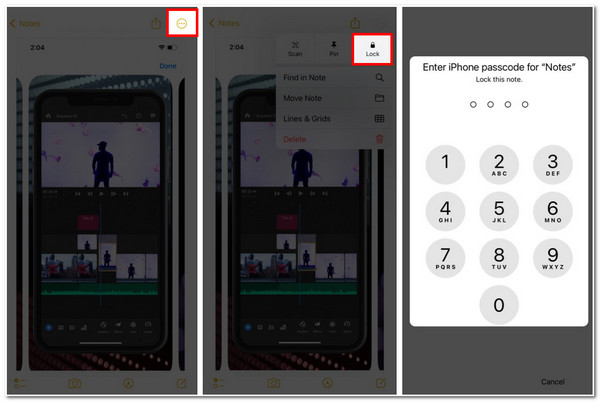
Step 1Launch the Notes application on your iPhone and head to the note that you want to add a password.
Step 2Next, tap More Options with the Three dotted icons at the upper right corner of your device’s screen. Then, from the options, select the Lock button.
Step 3Then, on the new screen, enter your desired Passcode.

Method 2. Lock all Notes on iPhone:
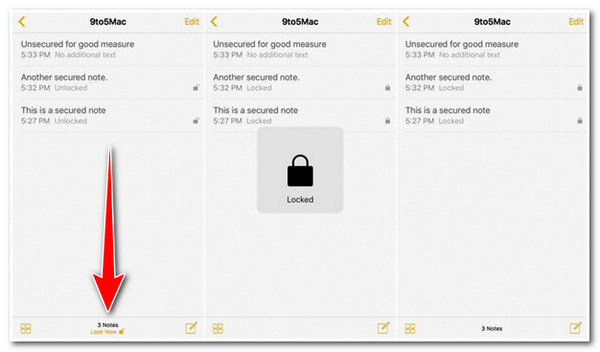
Otherwise, if you find it a hassle to lock notes on iPhone 16/15/14 one by one, you can lock them all out in just a few taps. To do it, here are a few steps you need to go after:
Step 1Access your Notes app on your iPhone and head to your Notes list.
Step 2Tap the Lock Now option at the bottom part of your screen.

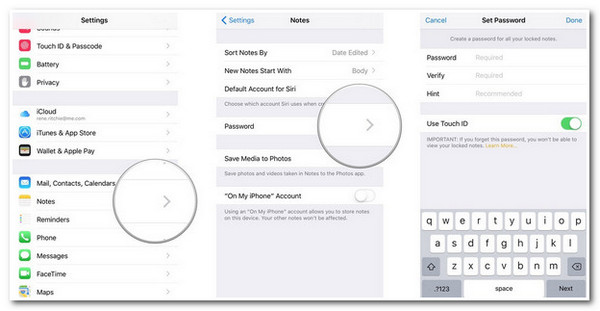
Aside from that, you can lock all the notes at once by locking them up on your iPhone Settings app. To do this, follow the steps below:
Step 1Launch your iPhone Settings app, browse, and tap Notes.
Step 2Then, tap the Password option and enter your preferred Password; confirm it by entering it again under the Verify option and adding some Hint. You can also enable your Touch ID for much better security.
Step 3Once done, tap the Done button at the upper right corner of your device’s screen.

Recommendation: How to Recover Deleted Locked Notes on iPhone?
Now those are the 2 different methods of how to lock notes on iPhone 16/15/14. If you accidentally deleted important locked notes on your iPhone and you wish to recover them, then the best tool you can use is the 4Easysoft iPhone Data Recovery tool. This tool supports almost all models and versions of Apple devices, whether an iPhone, iPod, or iPad. It can recover data, like notes from different scenarios such as accidental deletion, system crashes, forgetting passwords, etc. Moreover, features and functionality are easy-to-understand and are well-composed on an intuitive user interface. This aspect makes recovering deleted notes easy, efficient, and quick! These are just a glance at its infused features and capabilities; it still has much to offer! Explore them all now!

Equipped with three advanced data recovery modes: Recover from iOS devices, Recover from iTunes, and Recover from iCloud Backup.
Infused with a powerful iOS System Recovery feature that fixed iOS issues with a high success rate without any data loss.
Support more than 20 file types that can be recovered, including notes, messages, media files, voicemail, social media data, etc.
Allow you to back up and restore tons of notes and recover them with ease.
100% Secure
100% Secure
FAQs about How to Lock Notes on Your iPhone
-
How to set up a custom password on iPhone 16 to lock notes app?
To set up a custom password for Notes, head to your Settings app and select Notes from the options. After that, under the Notes screen, tap the Password option. Then, tap the Use Custom Password and confirm your selection by entering your Passcode or Face/Touch ID. Next, enter your new password, and verify it by entering it again and adding a Hint. Once satisfied with your setups, tap the Done button.
-
How to lock Notes on iPhone 8/8 Plus/X?
To lock specific notes on your iPhone 8/8 Plus or X, launch your Notes App and tap the Share icon at the upper right corner of the screen. Next, tap the Lock Note from the options below and set your preferred password. Once you are done with it, tap the Done button.
-
What will happen if I forget my Notes’ password on my iOS device?
In case you forgot the password to your Notes, sadly, Apple can’t provide you a solution to regain access to them. But you can reset your old password; however, this will not provide you the ability to have access to your old password forgotten notes.
Conclusion
That’s it! Those are the 2 workable methods showing you how to lock notes on iPhone 16/15/14! You can either set a strong password for each note or lock them all at once. If you mistakenly deleted a specific important note on your Note app, don’t worry; let the 4Easysoft iPhone Data Recovery tool help you recover that note for you. This tool is capable of recovering notes using its in-depth scanning and previewing of them on its interface, and it lets you decide which note you want to recover! In just a few steps, you can return your deleted notes to your device! Feel free to visit this tool’s official website and discover its full capabilities today!
100% Secure
100% Secure


