For Windows
 For Mac
 Free Online Solutions
Content
Start
Introduction
4Easysoft Mac DVD Ripper is a versatile tool to rip DVD/Blu-ray discs and AVCHD files to 500+ formats and preset formats for all devices. During the process, you can adjust the bitrate, frame rate, and resolution to keep high output quality. Its video enhancer can easily improve the resolution of Blu-ray movies to 4K UHD. Moreover, you can make use of various editing tools to set multiple subtitles, merge discs, add watermark, and more. Download and install this powerful disc ripper now!
Register
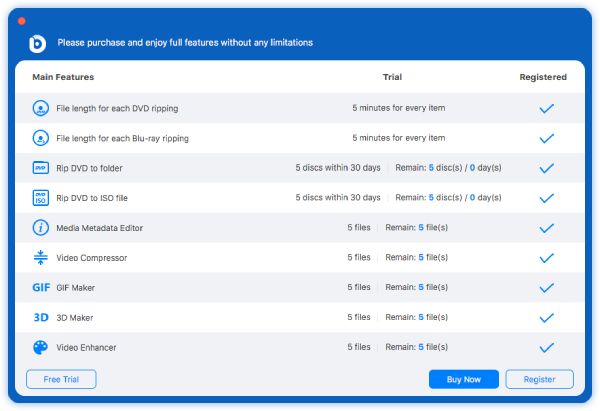
When you launch the software on your Mac, you can see the software list all differences between the free version and the registered version, which you can or cannot use the features in these two versions.
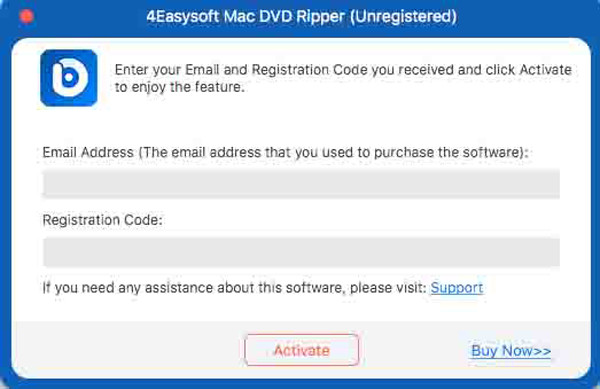
If you want to experience the full features of the software, you can register the software by click the Register button. Then, you can enter your email address and registration code, and click the Activate to unlock all the features.
Email Address: The email address you use to purchase the software and receive the email we send.
Registration Code: The license code you received in the order confirmation letter in the above email address.
Update
4Easysoft Mac DVD Ripper offers free updates for registered users to fix the bugs and improve the features. You can choose either to upgrade the DVD ripper manually or automatically to get the latest experience.
Manual Update: Go to the official website of 4Easysoft Mac DVD Ripper and check if there is new software version. Just download it manually to upgrade.
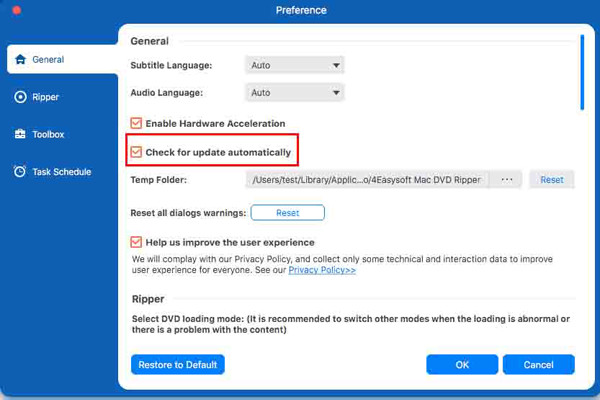
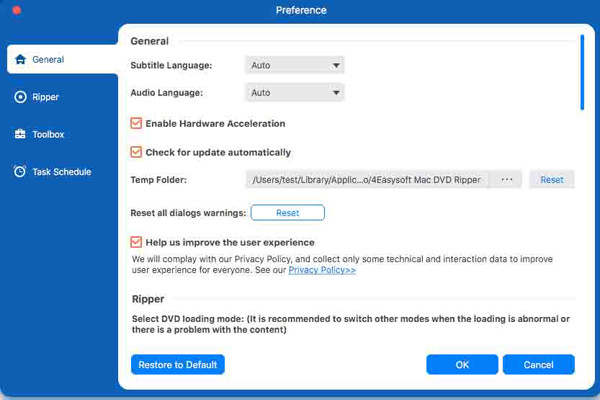
Automatic Update: Click the Preference menu and go to the General tab by default. Now, you can tick the checkbox of Check for update automatically. After that, you will receive an update notification when there is an update.
Preference
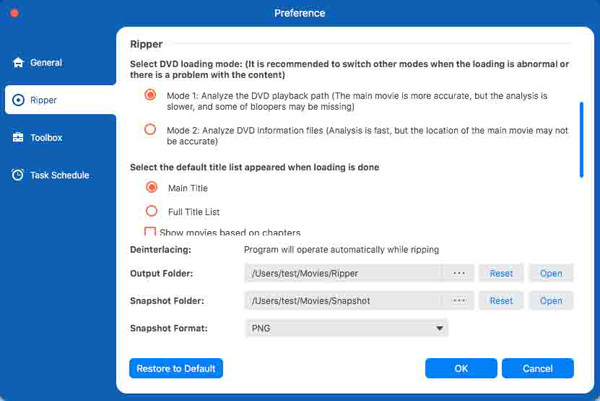
You can go to the Preference menu to customize the Mac DVD Ripper for a better user experience. There are 4 settings that could satisfy your customization, including loading mode, saving path, and more.
General
In the General tab, you can choose the desired ripping subtitle and audio language according to your need. You can also enable the GPU acceleration to get the 30X faster ripping speed. In this way, you can get the ripped DVD/Blu-ray movies in several minutes.
Ripper
In the Ripper interface, you can select the DVD loading mode, output folder, snapshot folder, settings for adding the subtitles and audio, and so on. Moreover, you can choose the default title list to show your DVD/Blu-ray content. Since 4Easysoft Mac DVD Ripper also supports taking snapshots, you can also set the output folder and image format for screenshots.
Toolbox
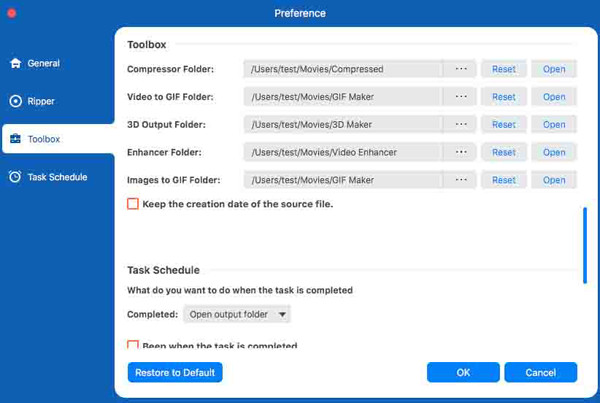
Go to the Toolbox preference is mainly for editing your DVD/Blu-ray content. Whether you want to compress the ripped videos, convert video to GIF, make 3D movies, or enhance the video quality, you can set the destination for saving them in different folders.
Task Schedule
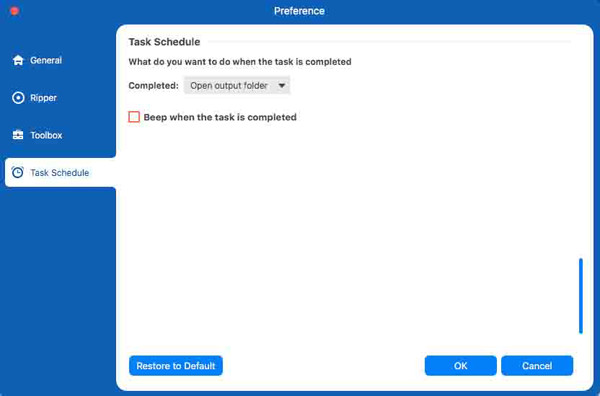
When you navigate to the Task Schedule tab, you can choose to open the output folder or shut down the computer or others when the ripping task has been done.
Rip DVD/Blu-ray Disc
4Easysoft Mac DVD Ripper can help you rip DVD/Blu-ray Disc, ISO files and AVCHD folder to any desired formats. Just follow the steps below to start.
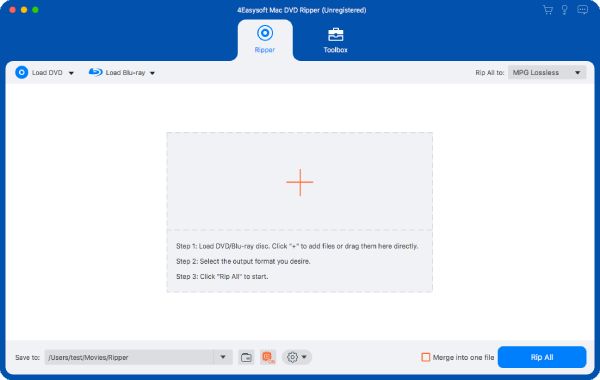
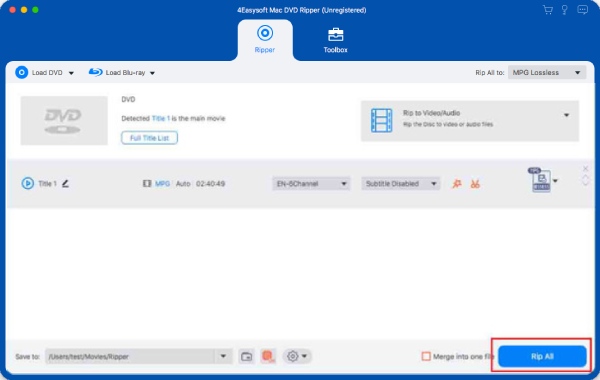
Step 1Load DVD/Blu-ray Disc
When you launch the program, click the Load DVD or Load Blu-ray drop-down list and choose from 5 options which are Load Disc, Load ISO, Load Folder, Load AVCHD Disc, and Load AVCHD Folder. You should insert your Disc first.
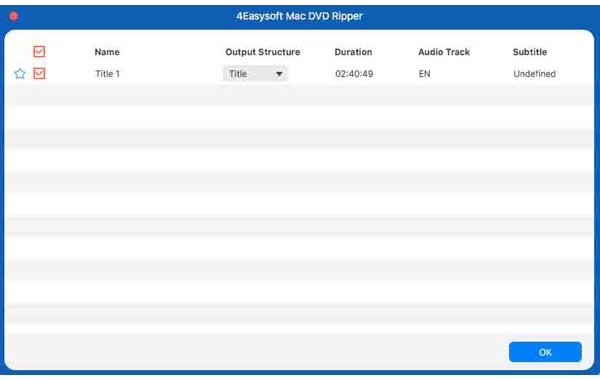
Step 2Choose the Desired Titles
After analyzing the DVD disc, you can choose to display the main title or full title list. And you can also click the Full Title List button to load all titles and tick the checkbox of the desired chapters you want to rip. Click the OK button to save the settings.
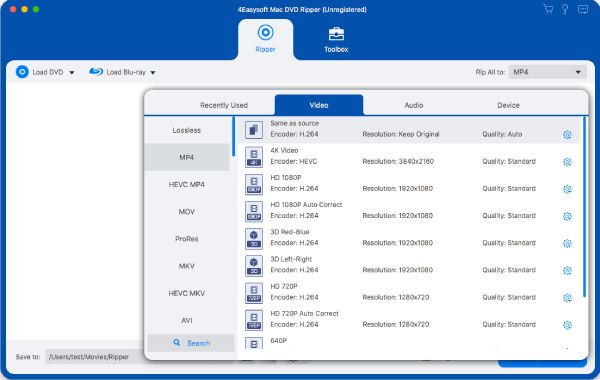
Step 3Select the Output Format
Click the Rip All to button in the right-top corner and select the desired format from the Video, Audio, and Device tabs. Here you can rip DVD to lossless MPG, commonly-used MP4, and MP3/AAC/WMA, etc.
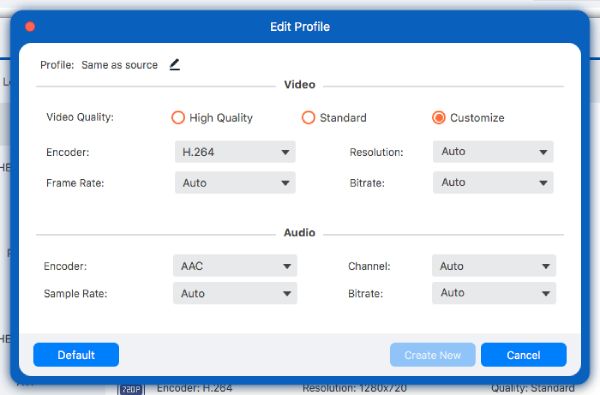
Step 4Customize the Settings
After choosing the desired format, you can click the Custom Profile button with the Gear button to adjust the encoder, resolution, frame rate, bitrate, and more to keep the original high quality of DVD movies. Normally, DVD Disc contain 1080P HD movies.
Step 5Save the Ripped DVD
At last, go back to the main interface and check the audio track and subtitles. Then, click the Rip All button to start the ripping process.
Edit DVD/Blu-ray Disc
There are many editing effects that could apply to your DVD. Click the Cut and Edit buttons to go to the editing DVD interface, and you should choose other formats rather than MPG Lossless because it will provide you with more benefits.
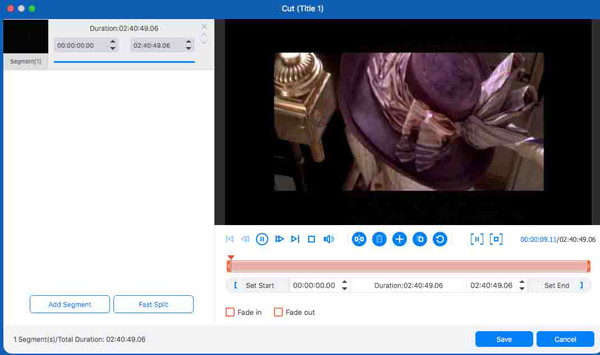
Trim & Split Video
If you want to trim your DVD to get the length you want, you can use this feature to reach your purpose easily. After clicking the Cut button, you can adjust the slider and click the Add Segment button to clip the desired parts to several segments.
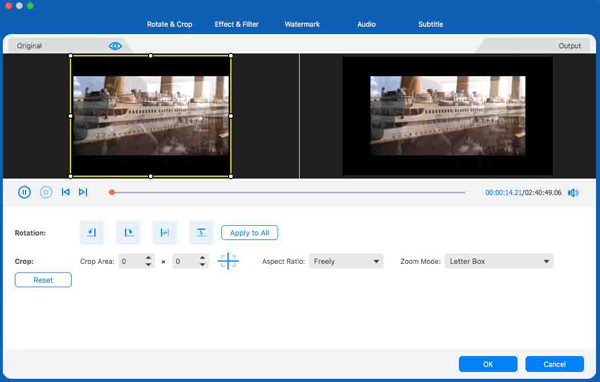
Rotate & Crop Video
When you click the Edit button, you will go to the Rotate & Crop tab by default. You can set the cropping area value or drag the frame border to fit your preference. Moreover, you can choose a zoom mode from Full, Letter Box, or Pan & Scan. You can also rotate and flip your DVD/Blu-ray movies horizontally or vertically.
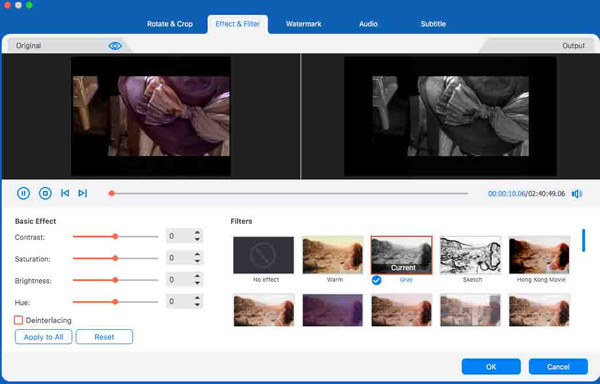
Adjust Effect & Filter
In the Effects & Filters interface, you can choose different filter effects, such as Gray, Hong Kong Movie, Sketch, Warm, Modern, etc. Alternatively, you can choose to change the video effects manually through the setting of brightness, contrast, hue, and saturation according to your needs. You can either move the slider or change the number.
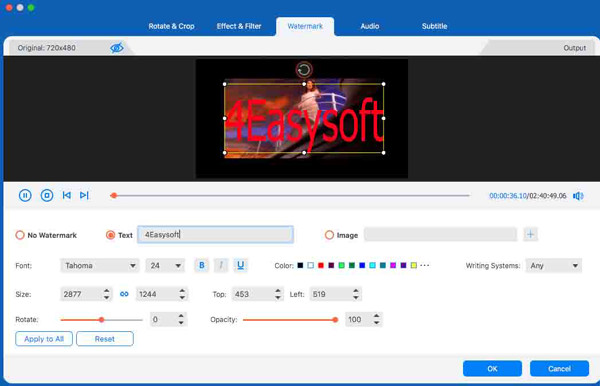
Add Watermark
Adding a watermark is a good way to protect your copyright if you will share it with others. You only need to go to the Watermark tab, where you can select to add text or image watermark into the video. There are also options to adjust the font size, font style, font color, front position, opacity, and so on for text watermark. You can also change the position, size, and other things for the image watermark.
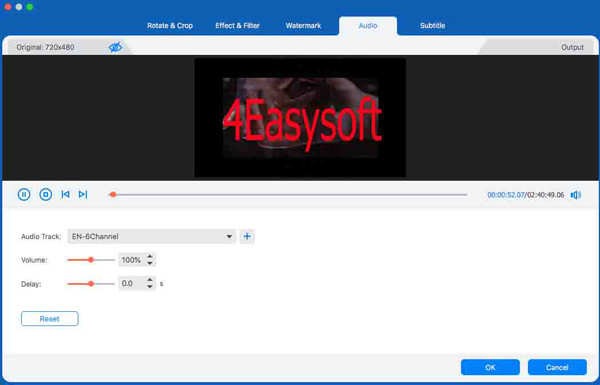
Edit Audio Tack
Go to the Audio tab, where you can choose an audio track for the ripped DVD file, or silence it. If you want to create another new-style video, you can add one or more audio tracks into the DVD title. What’s more, you can adjust the slider to change the Volume and Delay.
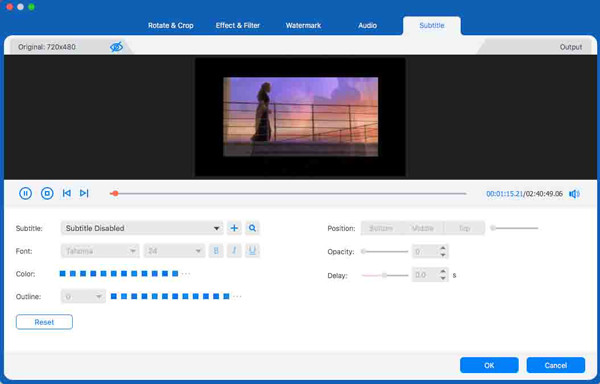
Edit Subtitle
If you want to create or change a subtitle file, you can go to the Subtitle tab to complete your process. You can also customize your subtitle by adjusting the position, opacity, size, font style, color, and so on under the video.
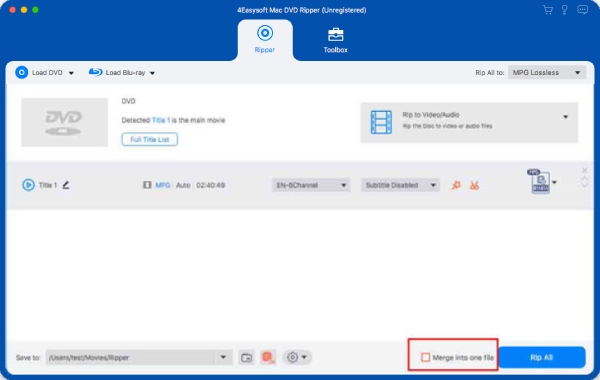
Merge Video Clips
When you want to combine the short titles into a long one, you can use the merge feature. First, you can select the titles you want to merge, and then check the box of Merge into one file next to Rip All. Then, wait for the titles to merge into one.
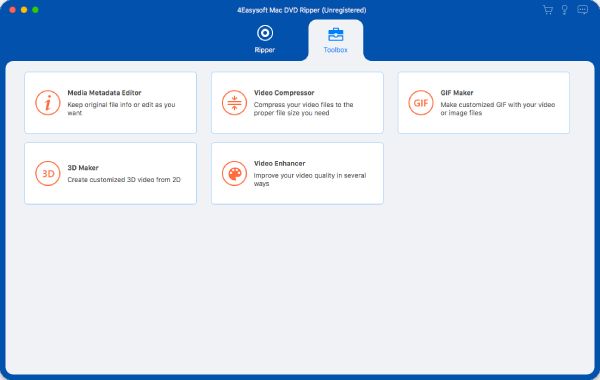
Toolbox
Toolbox is an extra function of 4Easysoft Mac DVD Ripper. With this tool, you can regard it not only as a disc ripper but also as a multi-function editor. There are Media Metadata Editor, Video Compress, GIF Maker, 3D Maker, and Video Enhancer in the Toolbox interface.
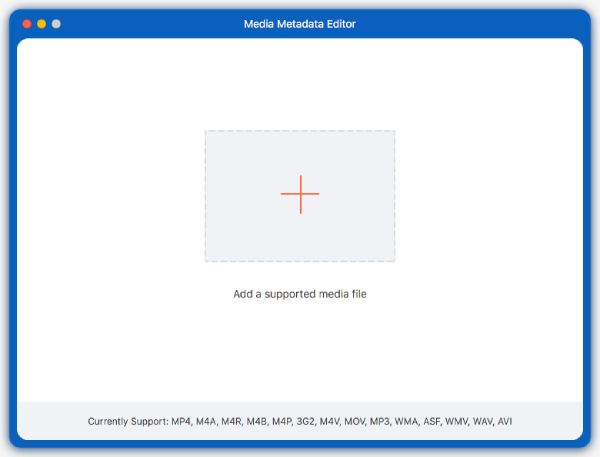
Media Metadata Editor
While using a Media Metadata Editor, you can keep original file information or edit the file information for your needs.
Step 1 Click the Media Metadata Editor button in the toolbox and click the Add button to upload the ripped DVD/Blu-ray videos. The editor support MP4, M4A, M4R, M4B, M4P, 3G2, M4V, MOV, MP3, WMA, ASF, WMV, WAV, and AVI.
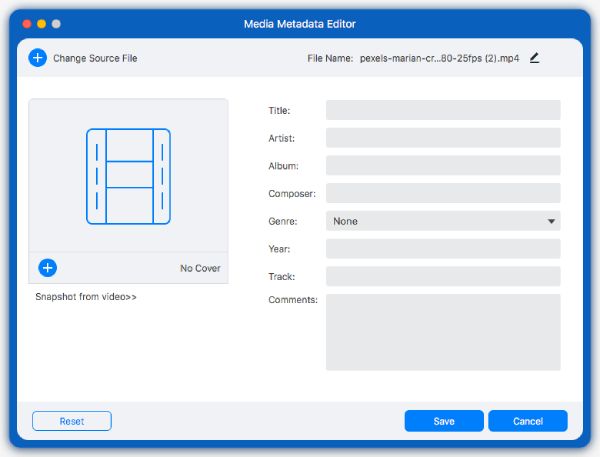
Step 2 After that, you can edit the ID3 tag or the video information like album, composer, genre, year, and so on. Then, click the Save button to finish editing.
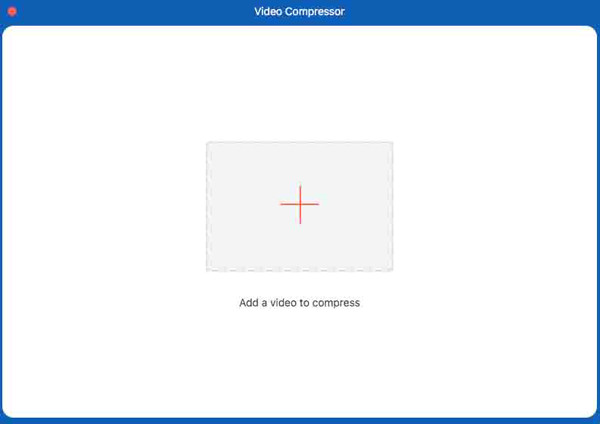
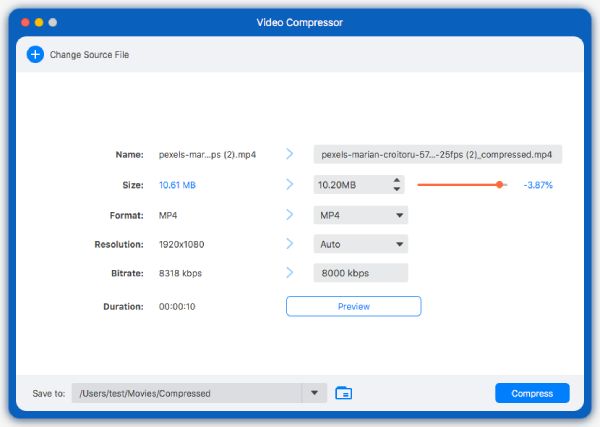
Video Compressor
When you find out that the size of your video is too large and you need it to be smaller, you can use this feature to satisfy your requirement.
Step 1Click the Video Compressor button in the Toolbox and click the Add button to add the desired large DVD or Blu-ray movies you want to compress.
Step 2You can change the number to set the size of the file. Then, choose the output format, resolution, and bitrate to compress the file size as you like. You can even click the Preview button to see the effect.
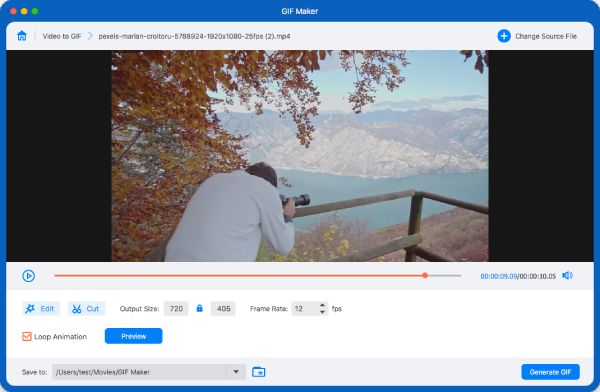
GIF Maker
If you want to create an animated GIF image, this tool could help you. In the GIF Maker, you can create a GIF from a video or photos.
Step 1Click the GIF Maker button in the Toolbox and click the Add button to choose a video or several photos you want to create GIF.
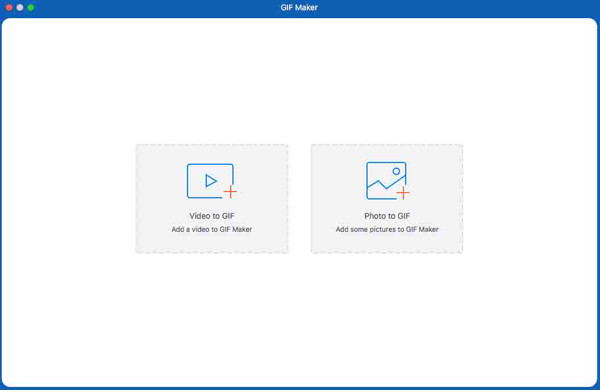
Step 2Click the Edit button to add the video effects and the Cut button to cut down the segments. Then, you can adjust the output size and frame rate to export high-quality output. ton to see your GIF.
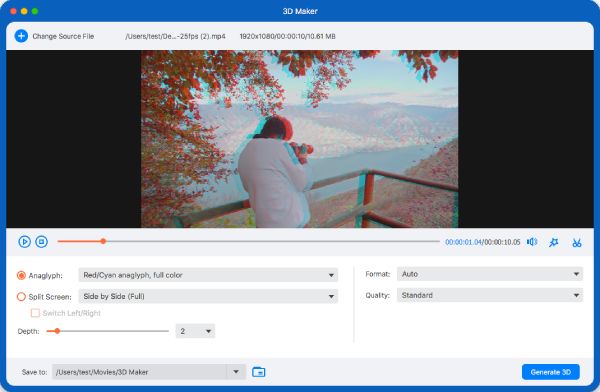
3D Maker
4Easysoft Mac DVD Ripper can easily rip 3D movies with the original quality, and it also supports converting 2D videos to 3D. Here are the detailed steps:
Step 1Click the 3D Maker button and click the Add button to add your ripped DVD/Blu-ray movies.
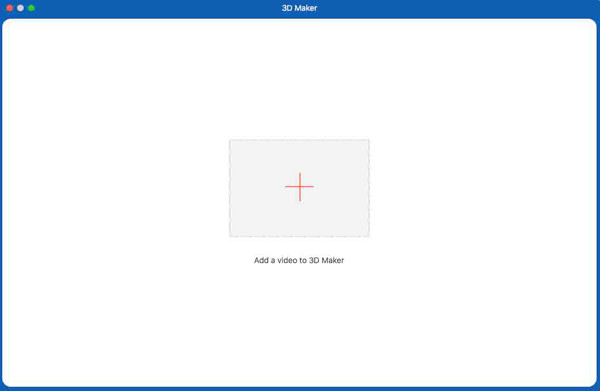
Step 2Then, you can choose a 3D anaglyph effect from Red/Cyan anaglyph, monochrome color to Amber/Blue anaglyph, full color. You can also choose to use the Split Screen function to make 3D movies. At last, select the format and quality and save the settings.
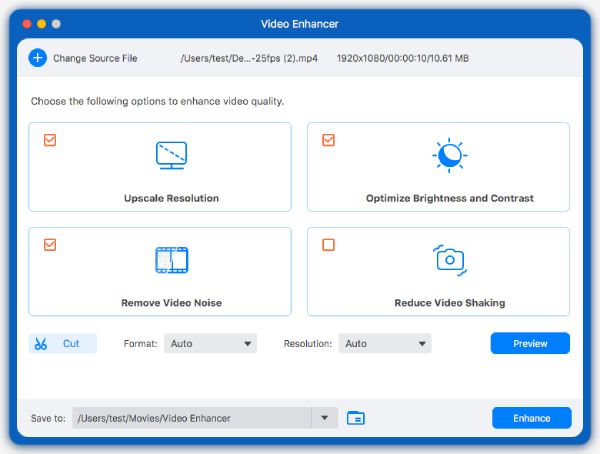
Video Enhancer
With this tool, you can improve video quality by resolution upscaling, brightness and contrast optimizing, denoising, and stability improvement.
Step 1Enter Video Enhancer in the Toolbox and click the Add button to add a video.
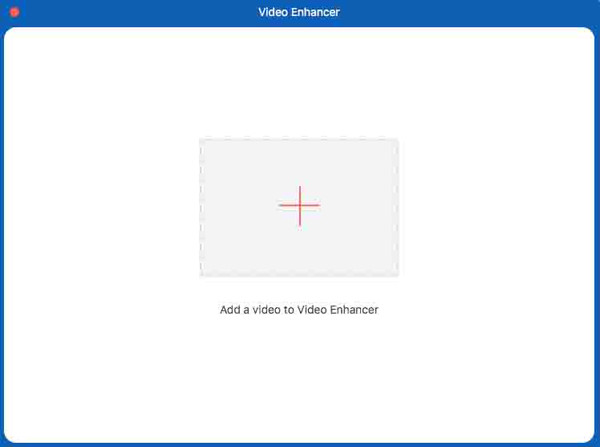
Step 2There are four options to improve the quality of your video file: Upscale Resolution, Optimize Brightness and Contrast, Remove Video Noise, and Reduce Video Shaking. You can freely adjust the settings and choose the output format as you like.