4Easysoft Total Video Converter4Easysoft Screen Recorder
  • License&Activation
  • Video&Audio Recording
  • Phone Recording

Popular Questions

Q: What are the differences between the free trial and the registered version?

Both the free version and full version of 4Easy Screen Recorder enable you to record video with audio and take screenshots without watermark. But the free version has a 3-minute time limitation while the full version has no limit about the recording length. Moreover, the registered version also supports additional functions, including noise cancellation, voice enhancement, and video trimmer to get the desired video or audio recording with high quality.

Q: Can I use one registration code on both Windows and Mac?

No, you can’t. 4Easysoft Screen Recorder provides two different versions of registration codes for Windows and Mac. The code for Windows can only be used on Windows PC, same as Mac. If you have bought the wrong version or want to get another one for Windows and Mac, don’t hesitate to contact us at [email protected].

Q: The hotkeys are occupied. How to fix it?

Maybe you have launched other programs that have the same hotkeys. In this case, you need to change the hotkey settings to start/stop/pause recording and take screenshots easily.

After launching 4Easysoft Screen Recorder, you can click the Menu icon and choose the Preferences option. In the popping-up window, click the Hotkeys button. Here you can replace the occupied hotkeys with other desired keys.

Q: How to record videos in high resolution and quality?

The resolution of recordings is decided by the screen size you capture. If your monitor is 4K, you can capture the full screen in 4K resolution. Moreover, you can go to the Preferences option and change the Output settings to keep the lossless quality. You can set it to lossless, highest, and high quality..

Q: Can I capture the video with audio on my computer?

Of course, you can. With this powerful video and audio recorder, you can capture the screen with the sound from the system or microphone. Just turn on the Microphone and System Sound buttons before recording..

Q: Where are my recordings saved? And can I change the location?

When you save the recordings, you can directly choose the desired file folder to store them. Moreover, you can also change the default output settings in advance. Go to the Preferences option and click the Output button, and then you can change the location of the output file.

Q: What capture mode should I choose to record the screen?

This powerful screen recorder provides 4 capture modes for different user experiences. You can choose the suitable one according to your requirement and computer configuration.

Auto mode: It’s the default mode to adjust the recording quality based on your computer performance. This is recommended for convenient use.

ode 1 (Common) Magnifier: Mode 1 (Common) Magnifier: A standard capture code guarantees the quality and fluency.

Mode 2 (Windows 10 1903 and later) WinRT: This mode will improve the recording quality for Windows 10 1903 and later versions. If you turn on this mode, there will be a yellow border around the recording frame.

Mode 3 (Common) DXGI: This capture mode will lower the recording quality. You can choose it when the recording is not fluency.

Q: How to fix phone screen recording not working because of the Windows Defender Firewall?

If you failed to use the Phone Recorder on your Windows, here are 2 solutions for you:

1. Open the mirrorrender through the Windows Defender Firewall.

Step 1: Press the Windows + R buttons on your keyboard and input control in the popping-up window.
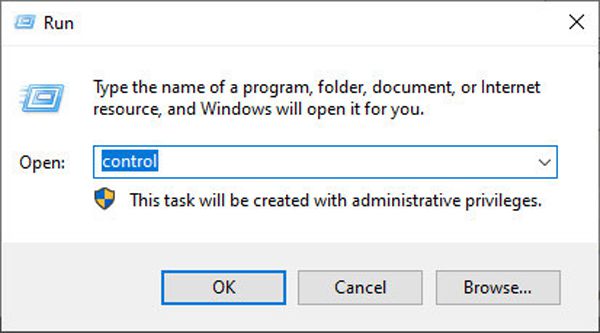
Open Control Panel

Step 2: After running the Control Panel program, you can click the System and Security button. Then click the Windows Defender Firewall button and choose the Allow app or feature through Windows Defender Firewall option.
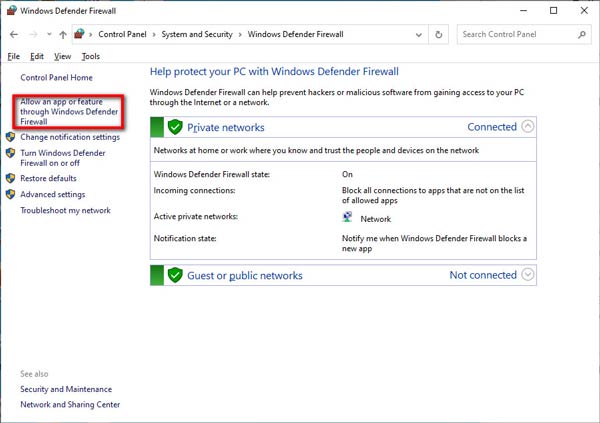
Click Allow an App

Step 3: Find the Mirrorrender function in the list and tick the Private and Public options to allow mirrorrender for using the Phone Recorder successfully.
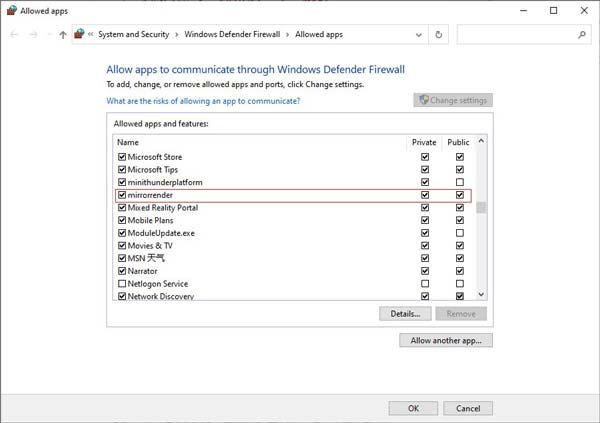
Allowed Apps

2. Directly Turn off the Windows Defender Firewall on Your Computer.

Step 1: Same as method 1, you can press the Windows + R buttons to launch the Run program. Then input control to open the Control Panel settings.

Step 2: Choose the System and Security setting and click the Windows Defender Firewall button. After that, choose the Turn Windows Defender Firewall on or off option.
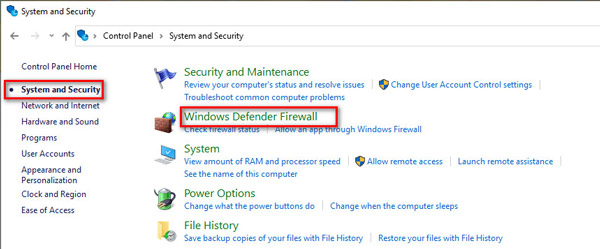
Select Windows Defender Firwall

Step 3: Finally, you can choose the Turn off Windows Defender Firewall option under both the private and public network settings.
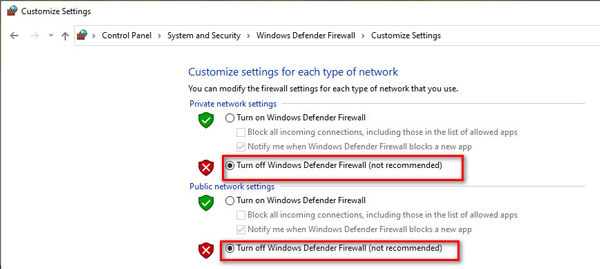
Turn off Windows Defender Firwall

Q: How to download the USB driver for Android for phone recording?

Before screen recording of Android devices, you need to download the USB driver on your computer and connect your phone to the computer via USB cable. Since there are so many USB drivers for different Android phones, the best way is to download the USB driver from the official website of your Android phone.

Q: If my computer can’t connect my phone, what should I do?

If the USB connection is stable but the two devices can’t be connected, you can contact us at support@4easysoft.com and send your device information.

If you are an Android users, please provide the brand, model, and system version.

If you are an iOS user, please provide the model and iOS version of your device.

Q: What USB debugging mode can do and how to enable it?

USB debugging mode will allow Android users to connect their phones to the computer and streamline advanced operations of Android Studio, including data management, log data check out, etc. Here are the detailed steps for different Android versions:

For Android 2.3 and earlier: Go to the Settings app. Tap the Applications button and choose the Development option. Check the USB Debugging Mode and ensure it is on.

For Android 3.0 to 4.1: Open the Settings app and choose the Developer Options button. Turn on the USB Debugging Mode function.

For Android 4.2 and later: Navigate to the Settings app. Scroll down to find the Build Number option and tap it 7 times. Then go back to the last page, choose the Developer Options button, and enable USB Debugging Mode.

Q: How to cast Android audio to computer for recording?

Mirroring the phone to the computer will only show the screen without the audio. If you also want to record the audio from your Android phone on the computer, you should follow the steps below to cast Android audio to the computer:

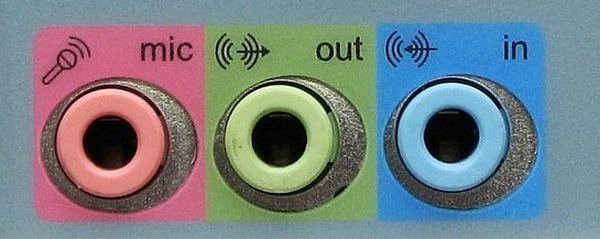
Step 1: To connect your Android phone to computer and transmit the audio, you need an aux cable at first. If you use a desktop computer, you need to find the Line-in interface in blue color and plug the aux cable in.

Blue Line in Port Computer

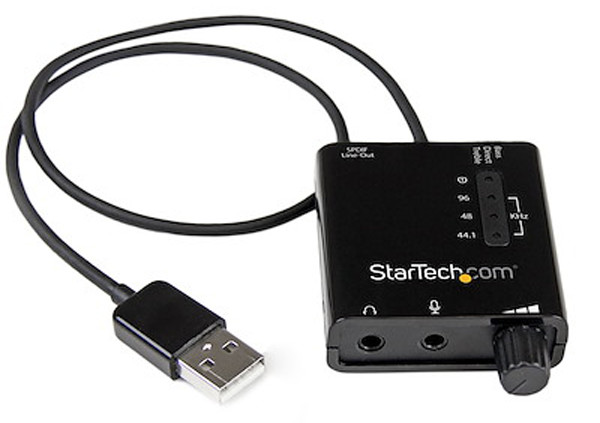
For laptop users, you have to rely on an external USB sound card to transmit and record Android audio. Plug it into the USB port of your computer, and then plug the aux cable into the sound card and your Android phone.

Externel USB Sound Card

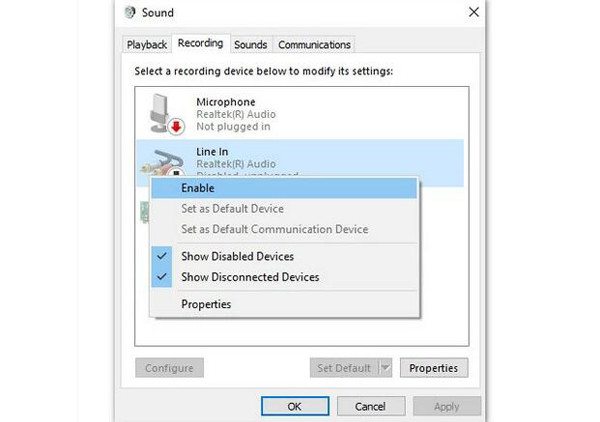
Step 2: Right-click on the Sound icon in the bottom-right corner and choose the Open Volume Mixer option. Then click the System Sound button and choose the Recording menu. Here you can find the Line-in input setting. Just right-click it and choose to enable it. You can also select the Properties option and tick the Listen to this device box.

Recording Settings of System Sound

Step 3: Now, you have transmitted the Android audio to the computer. Go to 4Easysoft Screen Recorder and enable the system sound to start recording Android audio on the computer.

Icon

4Easysoft Screen Recorder – All-in-one Software to Capture Video, Audio, Gameplay, Take Screenshots, etc.