Record video, audio, gameplay, and webcam to record precious moments easily.
Where Does OBS Save Recordings, and How to Change It?
After recording your awesome gameplay experience on OBS to share for tutorials, you may ask, “Where does OBS save my recordings?” For easy workflow and access, knowing your recording location is a must. Hence, this post is here to answer your concern about the OBS recording location, as well as how you can change these paths to suit your needs. Dive in now to enhance your recording experience with Open Broadcaster Software.
Guide List
Where Does OBS Save Recordings on Windows/Mac How to Change OBS Recording Settings and Location Detailed Steps to Record Gameplay with OBS Best Alternative to OBS for Recording and Saving VideosWhere Does OBS Save Recordings on Windows/Mac
Among the best open-source screen recorders, the OBS or Open Broadcaster Software automatically saves recorded video on the default path. Once the OBS recording operation has been completed, the recording won’t be on your screen instantly; instead, you should open the recording folder and access all videos recorded in OBS.
Where’s that default path of OBS, then? Check this detailed right here:
• If you’re using a Windows PC, the default location of all your OBS recordings is in C:Users
• On a Mac computer, you can find your OBS recording in the ~/Movies.
Step 1Inside the OBS program, click on the “File” menu above, then select “Show Recordings” from the menu list.
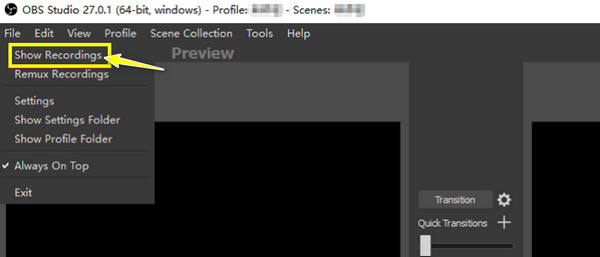
Step 2All your recordings will be shown on your screen, together with their time, date, and format.

How to Change OBS Recording Settings and Location
Now that you’ve answered your ‘Where does OBS save recording’ question in the first part, you perhaps want to change the saving location into your own personalized folder. Is it possible? Certainly! While all OBS recordings are stored in a default destination, you can also modify a path by following these steps:
Step 1Fire up the OBS program on your computer screen. Next, go to the “File” menu above, then choose “Settings” from its menu list.

Step 2From the “Settings” window, move to the “Output” tab and look for the “Recording Path”. Once found, pick a folder where you’d love to store your OBS recording by clicking the” Browse” button; click the “OK” button for confirmation.
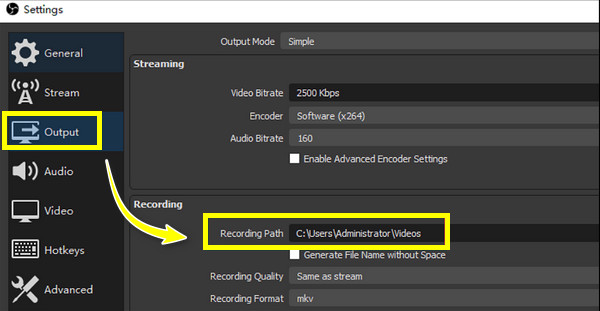
Step 3Don’t go just yet; you can alter the necessary settings in the same tab. You can set the format to MP4 for ease of use. Adjust the video bitrate between 2500 to 6000 kbps for high-quality while the audio bitrate to 160 kbps for clear audio.
Step 4Following that, slide into the “Video” tab and choose the 1920x1080 resolution. Then, for fps, you can consider using 60 fps if you have high-motion videos.
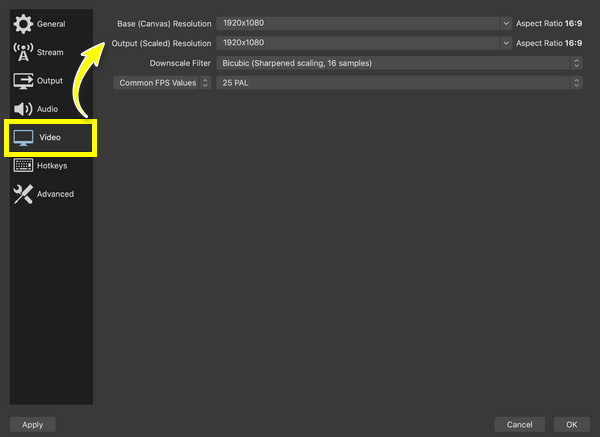
Step 5Are you satisfied with all these changes? If yes, click the “OK” button to save your settings. Now, your recording location and configurations will be applied to all your future OBS recordings.
Detailed Steps to Record Gameplay with OBS
Succeeding knowing the complete steps on how to change the OBS recording default location, it’s time to do recording! Once your gameplay or screen is set up, here’s a comprehensive guide to help you record with OBS.
Step 1Once you’ve launched the OBS application, select the “File” menu at the top and go to “Settings”. If the output settings have not been determined yet, configure them first from the “Output Settings” tab.
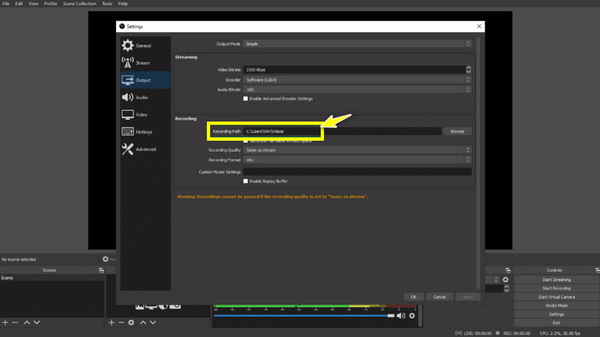
Step 2Going back to the main OBS window, find the “Scenes” box underneath, and click the “Add” button for a new scene; you can name it something related to your recording.
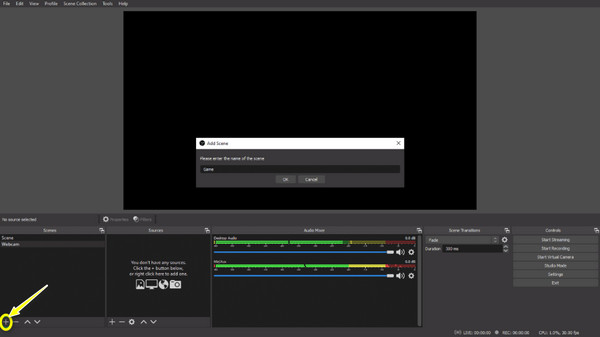
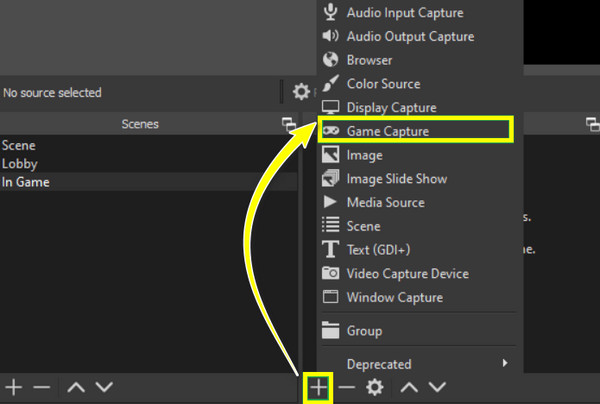
Step 3Next, from the “Sources”, click the “Add” button and choose the “Game Capture” option; name your source and click the “OK” button. Under the “Game Capture” settings, go for the “Capture Specific Window” and select your game from the list.
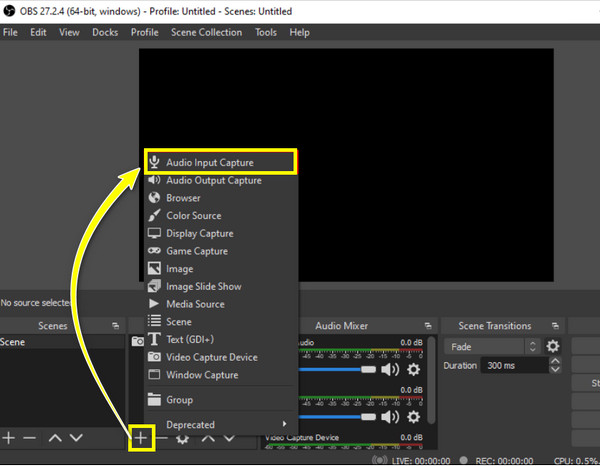
Step 4Following that, adjust audio settings through the “Sources” box, once again click the “Add” button, and select “Audio Input Capture” to include your microphone. Please make sure the “Audio Mixer” features the game sound and mic input.
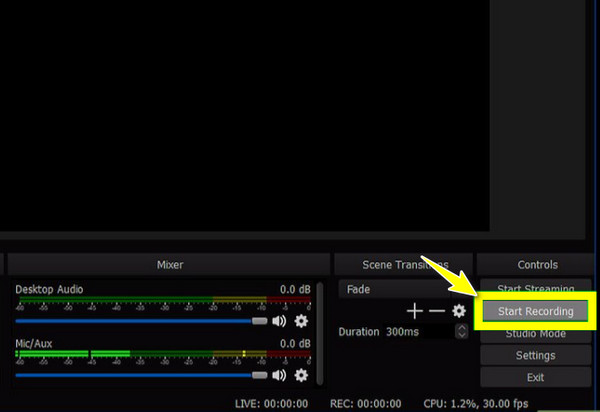
Step 5Now, once you’ve double-checked everything, click the “Start Recording” button at the down right corner of the window. Later on, when the game ends, click the “Stop Recording” button.
Step 6Check your recording in the folder you’ve chosen earlier in the “Output Settings”; you can review and edit it as needed.
Best Alternative to OBS for Recording and Saving Videos
If you want an additional option other than OBS to record gameplay and other screen activities, you’d be delighted to learn about the 4Easysoft Screen Recorder. This amazing recorder right here is best for assisting you in quickly recording gameplay, lectures, meetings, tutorials, and more. With the help of its CPU and GPU acceleration, it lets you record games with high quality and without experiencing any lag. Additionally, it comes with a variety of recording modes, including full screen, selected window, and customized regions. Using this outstanding OBS recording alternative, you can achieve the high resolution, desired location, and flawless recording you wish for.

With CPU and GPU acceleration tech, you can record games without lag.
Offer you high-quality recording settings for up to 4K resolution and 60 fps.
Provide a trimming feature for cutting out extra portions before exporting.
It has unique hotkeys that let you instantly start, pause, stop, and more.
100% Secure
100% Secure
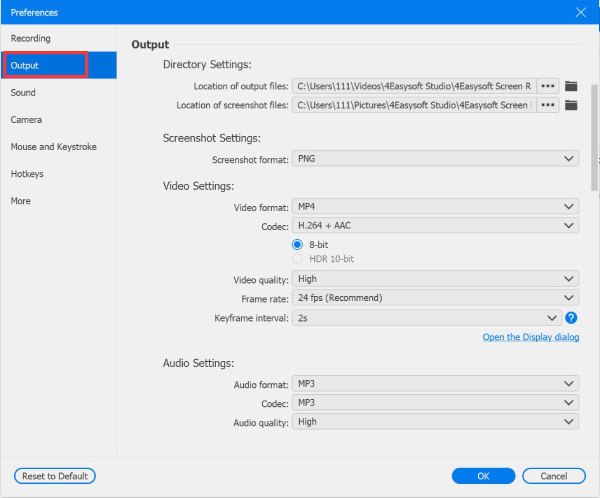
Step 1Upon starting the 4Easysoft Screen Recorder on your computer, head first to the “Menu” button and select “Preferences”. Here, you can set the path of your recordings and select the format, quality, and more. Click the “OK” button to save all changes.
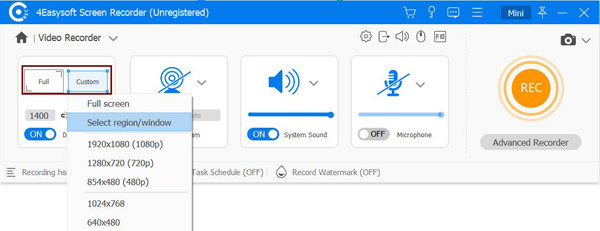
Step 2From the main page, go for the “Video Recorder” button to begin. Next, select between “Full” or “Custom” options for your desired way of capturing your screen. If you want to adjust the frame freely, go for the “Custom” button.
Step 3Afterward, configure the sound settings. Switch on the “System Sound” button to record the computer sound; switch on the “Microphone” button, too, if you wish to capture your voice.
Change their volume by pulling their respective sliders.

Step 4Once all the recording settings are settled, click the “REC” button on the side to begin. Remember to use the floating toolbox to annotate or screenshot during recording.

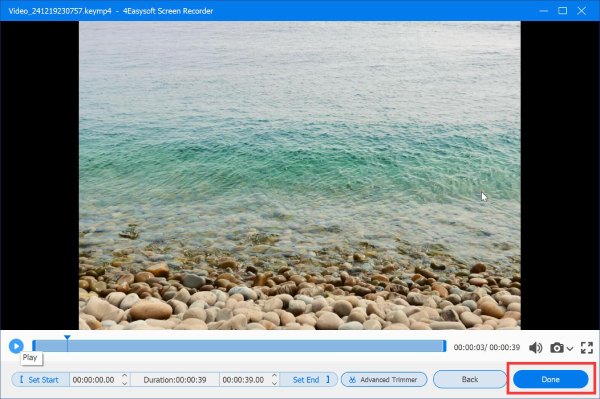
Step 5Later, click the “Stop” button to conclude the recording and be directed to the “Preview” window, where you can remove unwanted parts. To save your recording, click the “Save” button, then you’ll find the file in the path you’ve set earlier.
Conclusion
This ends the “Where does OBS save recordings?” post! Today, you’ve got an answer to that question with some bonus details, like changing the default OBS recording path and using OBS to record for starters out there! However, if you ever feel like something’s missing with OBS for recording your gameplay, consider its best alternative: the 4Easysoft Screen Recorder. This tool not only records smoothly but also ensures your output will be of high quality and saved on your chosen path. So, what now? Download it today and achieve the best recordings!


