Convert, edit, and compress videos/audios in 1000+ formats with high quality.
Professional Steps to Add Video Transitions in Premiere Pro
Adobe Premiere Pro offers many astonishing transition effects that will add beautiful visuals to your video and make it smoother. Now, the question is, how can you add transition effects to your video using Premiere Pro? To discover how, continue reading this post, for it features 2 workable ways to add transitions in Premiere Pro and how you can edit them. So, without any further ado, start exploring them now!
Guide List
How to Add Transitions in Premiere Pro [Detailed Tutorial] The Best Alternative to Premiere Pro to Add Preset Transitions FAQs about How to Add Video Transitions in Premiere ProHow to Add Transitions in Premiere Pro [Detailed Tutorial]
Although Adobe Premiere Pro offers a variety of transition effects, using it is challenging and complex for some. Now, this post provides detailed ways to add transitions to your video and are composed much more straightforwardly. So, start learning how to do it by exploring the simple steps on how to add video transitions in Premiere Pro:
Step 1Access your "Adobe Premiere Pro" on your computer, click the "File" tab, and then the "Import" button to import the videos you wish to add transitions. You can also press "Ctrl+I" on your keyboard as a shortcut.
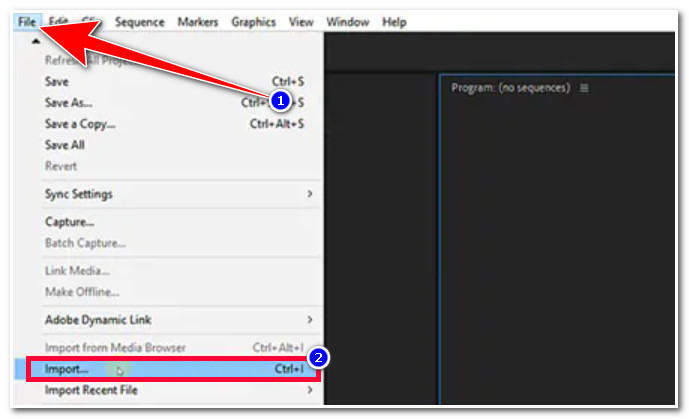
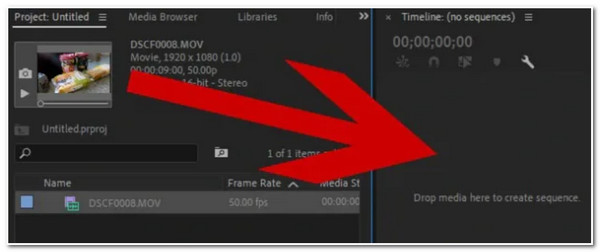
Step 2After that, head to the "Project panel", drag and drop the imported video on the "Timeline" to prepare it for adding transition process.
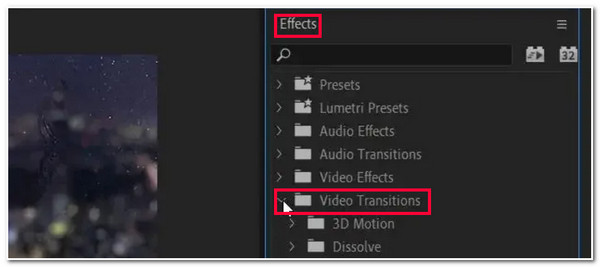
Step 3Next, tap the "Effects" tab at the upper part of the tool and select the "Video Transitions" folder. From there, you’ll see a variety of transitions, and choose the one you think suits your video.
Step 4Then, click the video transition effect, drag & drop it to the "Timeline", and put it on a specific area of your imported video clips.
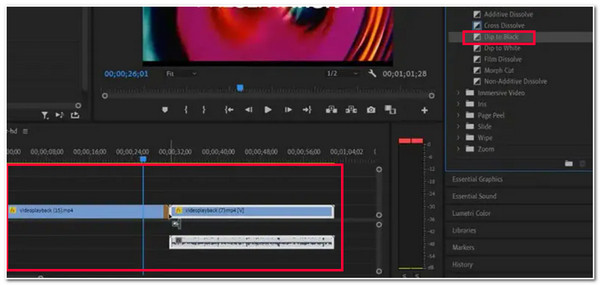
Commonly, transition effects are placed at the end of the first video and the first part of the second clip. This will bring a jumping (transition) effect to your video clips. You can tick the "Play" icon to see how the transition effect works.
Now that you have discovered how to add a transition in Premiere Pro, you still probably want to modify some aspects, particularly its default duration, to make everything flow perfectly. Fortunately, Premiere Pro offers various options to customize the applied transition effects. To do this, here are the steps you need to go after:
Step 1Head to your Adobe Premiere Pro, click the applied transition on the Timeline and select the "Effects Controls" tab at the upper left corner of the tool.
Step 2After that, right below the Effect Control tab, you’ll see a timeline with letters A and B. A is equivalent to the start time of the transition effect, and B denotes the end time of the effect.
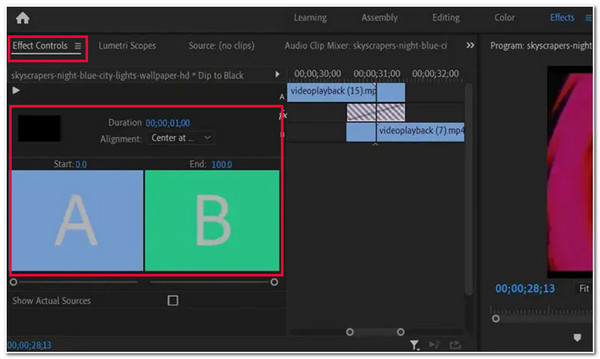
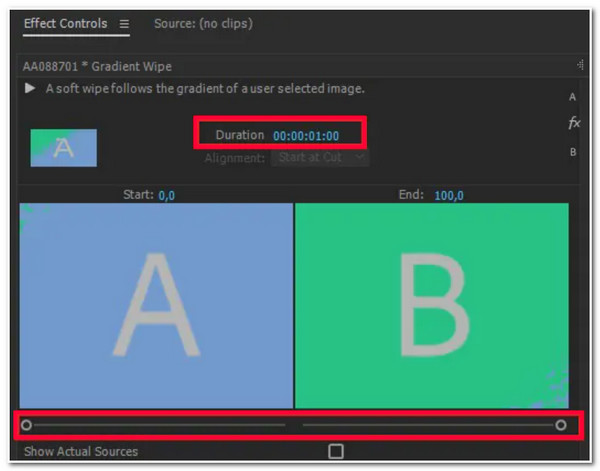
Step 3Then, you can modify the effects of your applied transition by changing the start duration (A) using its corresponding slider. Similarly, you can use the slider to modify the end duration (B) of the added transition in Premiere Pro.
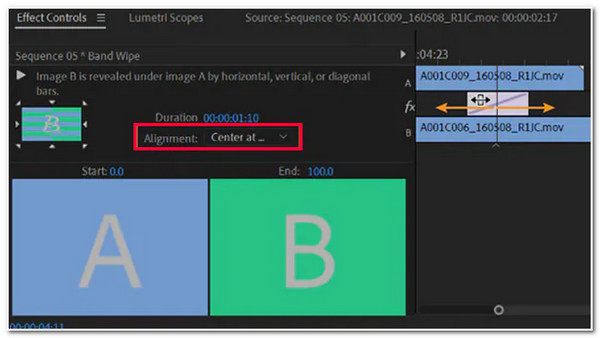
Step 4Next, you can modify the transition’s alignment by changing its Center, Star, and End cut. Once you finish it, you can play the video to see how the modified changes affect the applied transition to your video. Now, you can export Premiere videos to MP4 format.
The Best Alternative to Premiere Pro to Add Preset Transitions
There you have it! Those are the ways how to add video transitions in Premiere Pro and how to edit the applied transition. Now, Premiere Pro is too complex and tricky to execute the processes. If you are only working with a few videos and just want to use a much more convenient tool to add video transition effects, then the 4Easysoft Total Video Converter tool is what you need. This tool has a built-in MV Maker that offers a library of Themes with beautiful preset transitions! Moreover, every preset transition has graphical animations that add new flavor to your video. You can use this Premiere Pro alternative to add preset transitions and advanced effects to your videos.

Provide many preset themes in different types to add transitions to videos easily.
Able to edit the video clips one by one with many wonderful filters and effects.
Output tweaking option to modify the format, quality, resolution, frame rate, etc.
More powerful functions to compress, clip, enhance, and merge your videos.
100% Secure
100% Secure
How to Use 4Easysoft Total Video Converter as an Alternative for Adding Transition in Premiere Pro:
Step 1Download and install the 4Easysoft Total Video Converter tool on your Windows or Mac computer. Then, launch the tool, select the "MV" tab, and click the "Add" button to import the videos that you wish to add transitions.
Step 2Next, select the "Theme" tab and select your preferred Theme that suits your video. Each Theme comprises preset transitions; you can click the "Play" button to see how they work. In this way, you can automatically add transitions in premiere pro alternative.
Step 3Then, if you want to modify your video, click the "Edit". On a new window, you can rotate, crop, and add effects to your video clips separately. Once you are done, click the "OK" button. Moreover, you can add music to videos in the "Settings" tab.
Step 4Once you are satisfied with your overall setups, select the "Export" tab, and from here, you can modify your video’s format, resolution, frame rate, quality, etc. After that, click the "Start Export" button to export your edited video with preset transitions.
FAQs about How to Add Video Transitions in Premiere Pro
-
Does Adobe Premiere Pro offers a free trial?
Yes, it does! However, it only lasts for a maximum of 7 days. Once you reach beyond these days, your Creative Cloud Membership will continue, which comes with payment.
-
How to remove the applied transition effect to the video?
To remove the applied transition effects to the video, all you need to do is to click the applied transition on the timeline and press the Backspace key if you are using Windows. Otherwise, if you are using Mac, press the Delete key.
-
Can I also add audio transition effects to my video using Adobe Premiere Pro?
Yes, you can! With Adobe Premiere Pro, you can add audio transitions to your video by adding fade-in and fade-out effects to each clip you imported on the editor.
Related Articles:
That’s it! Those are the 2 workable ways how to add video transitions in Premiere Pro and on an alternative tool. With these 2 workable ways, you can now add new spice to your video by embedding great transition effects. If you find Adobe Premiere Pro too complex, you can use the 4Easysoft Total Video Converter tool as your best alternative! This tool offers a library of Themes that supports astonishing preset transitions that will bring remarkable changes to your videos! If this tool interests you, visit its official website for more advanced features! Take your first step today!
100% Secure
100% Secure


